DLTK's Educational Activities
Habitat Craft
 ©
©
Tasha's daycare made this craft one day in spring. They seemed to have a good time and Tasha came home talking about the habitats of a variety of different animals. I was actually quite impressed with how much they had learned while working on these crafts. I'll start out with instructions for the habitat Tasha made and then give some thoughts at the end on different habitats you might make. (Keep in mind, there's no template to print out with this project). I've tried to give lots of alternatives in the materials. Basically you need a shoebox. The rest is optional and subject to your own imagination and what you happen to have available.
 Note:
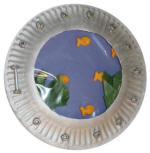
If you're studying an ocean habitat, you might prefer the porthole paper plate craft.
Note:
If you're studying an ocean habitat, you might prefer the porthole paper plate craft.
Materials Required:
- Shoe box with lid.
- Blue paint (and other colors if you like)
- Scissors
- Glue
- Cellophane, cling wrap or wax paper
-
Sand (you can substitute dirt from your yard if you don't have sand. Just make sure it's dry). Whole wheat flour works too.
peer through the hole to see your habitat
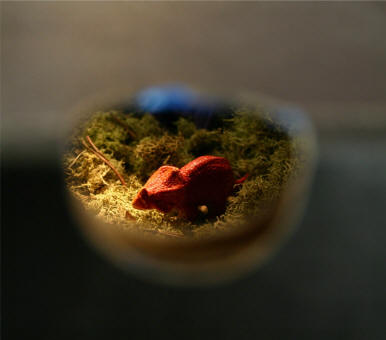
It looks better in real life, but this gives you
an idea of what it is like to look through the hole - Pinecones or small toy trees (must fit inside the closed shoe box)
- Bits of dried plant material (dried moss, dried flowers, dried leaves, etc) or bits of ripped up green and brown tissue paper or crepe paper.
- Rocks or pebbles.
- Small toy animals that you would find in a forest (bears, deer or dinosaurs... dinosaurs seemed to fit anywhere in the kids' minds).
Instructions:
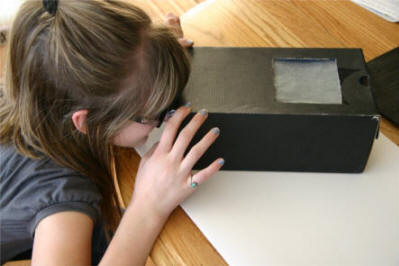
- This is tough to explain in words, so bear with me. Place the shoe box on the table normally (like you were going to put shoes inside it). It has a bottom (where we'll be making our habitat), 2 long sides and 2 short sides. In the center of one of the short sides, you are going to put a peep hole a bit bigger than a quarter. We'll use this hole on the finished craft to peek through to view the habitat (it's a neat effect... tricks the eye into thinking everything's big). Cut the hole on one of the short sides using a pair of scissors or a cardboard cutter. This part will require adult assistance. We actually had a shoe box with a hole already in it so we didn't have to cut one.
- Paint the inside of the shoe box blue (including the inside of the shoe box lid).
- Now, take the lid and cut a square out of it. Leave enough of the lid intact so that it's structurally sound. This hole will be the sky and will let light in the top so we can see things when we peek in the hole. Again this will likely require a bit of help from a grownup
-
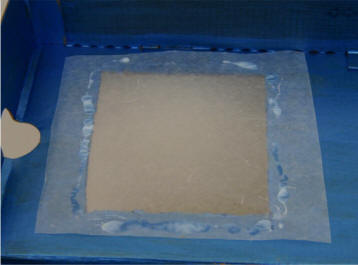 Glue or tape cellophane, cling wrap or wax paper onto the shoe box lid to cover the hole you just
made. (The cellophane is transparent so will let light through). If you use a tinted cellophane then the habitat will take on that tinge when you look through into it.
Glue or tape cellophane, cling wrap or wax paper onto the shoe box lid to cover the hole you just
made. (The cellophane is transparent so will let light through). If you use a tinted cellophane then the habitat will take on that tinge when you look through into it. - Now comes the fun part! Let's make our habitat:
- Glue sand or dirt to the bottom of the box. (We actually covered our bottom with dried mosses instead of dirt)
- Glue the pinecones or plastic trees to the bottom of the box as your trees
- Glue rocks or pebbles to the bottom of the box.
- Glue crepe paper, tissue paper, dried plant material, etc. into the box to make bushes and plant life.
- Glue your animals into the bottom of the box. Put them nearer the peep hole with the vegetation and trees in the background so when you look through you see the animals.
- You can use plasticine (playdough) to help attach some of the toy figures to the bottom of the box.
- Let everything dry, then put the lid back on (you might want to tape it so it stays attached)
- Option: Rather than simply painting the inside of the box blue, older children might like to paint the bottom green and the sides blue. Once dry, they can paint trees, shrubs, volcanos or mountains onto the sides (it's a bit tough because they're painting on the inside of the box, but it does look nice).
- Kids can also glue a few pieces of cotton ball onto the sides or top to make clouds in the sky. They can put on the lid and peek through the hole as they go to see how it looks.
- Note: We just covered the entire bottom of the box with glue and then arranged everything. We left it overnight to dry. This was enough to hold things alright (although they will come lose if you toss it around). Another idea is to leave the materials lose so the kids can rearrange their creation during playtime.
OTHER HABITATS (Again, I've just given thoughts... use what you have on hand... this is a great project for exercising creativity... go on a nature walk, collect items and then make a habitat box!):
- BIRDS IN THE SKY:
- Paint inside of the box sky blue
- Cover the bottom of the box with cotton balls so it looks like clouds
- Attach toy birds to pieces of thread or fishing line and hang them from the shoe box lid.
- FISH IN THE OCEAN:
- Paint the inside of the box sea blue or sea green
- It's nice to cover this one with a green or blue tinted cellophane if you have it.
- Glue sand or rocks to the bottom
- Glue aquarium plants into it. Strips of blue/green crepe/tissue paper make nice looking kelp. You can use spray starch if you want them to stand up a bit better.
- Put sea shells, lobsters or other ground fish on the bottom.
- Attach toy fish to pieces of thread of fishing line and hang them from the shoe box lid so it looks like they're swimming.
Printable version of these instructions