DLTK's Hickory Dickory Dock
Clock and Mouse Craft
 This is a great craft for kids just learning to tell time. Make sure
you check out the full Hickory Dickory Dock section for
more ideas and for verses to the popular nursery rhyme from one o'clock to noon
This is a great craft for kids just learning to tell time. Make sure
you check out the full Hickory Dickory Dock section for
more ideas and for verses to the popular nursery rhyme from one o'clock to noon
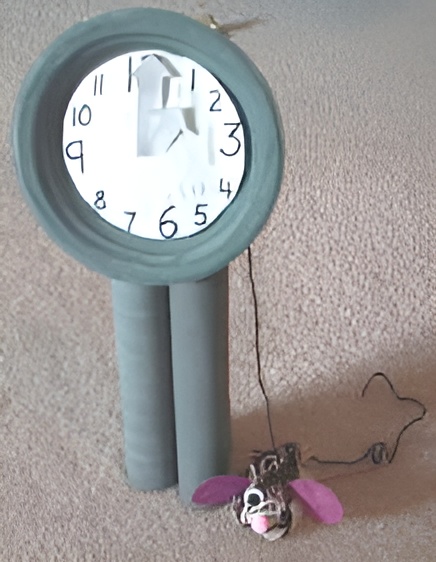
We made this craft when Kaitlyn was about 2 1/2 years old -- She's 4 1/2 now (yes, that's how long these things sit before I get them on the site sometimes *blush*). If you prefer, you can choose to make JUST the clock or JUST the mouse. If you're doing the craft with younger kids, you may want to make each part on a separate day (so they don't get tired). When we did it, we painted all the clock pieces and made the mouse on day 1. On day 2, we assembled the clock and added the mouse to it.
TEMPLATE FOR CLOCK
Materials:
CLOCK
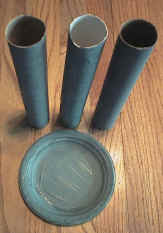
- 3 cardboard tubes ( paper towel) (or cut down gift wrap rolls to about the same size)
- ALTERNATIVE: substitute a Kleenex box for the 3 cardboard tubes.
- small paper plate
- brass fastener (optional)
- paint (whatever color you want your clock) or old paper bags or gift wrap
- glue,
- scissors,
- tape
MOUSE
- yarn (we used shades of brown + a short piece of
pink for the tail)
- The mouse looked a lot like "Tutter" from bear in the big blue house when we were done.
- If you used blue wool it would be a very good likeness.
- egg carton cup (the part that one egg goes into)
- piece of cardboard or a 3 1/4 inch diskette (temporary use)
- glue,
- scissors,
- piece of cardboard (small piece for the ears -- old cereal boxes work well)
- wiggly eyes (or make paper ones)
- small pom pom for a nose (or make a paper one)
Instructions:
 CLOCK:
- Paint all three cardboard tubes and the
plate (the top, eating part of the plate should be painted, not the
bottom)
- I realize we used a very odd color for our clock, but Kaitlyn is really enjoying mixing her own colors (she calls it her "science"). This is equal portions of Crayola blue, green and red plus a double portion of white.
- Let dry completely
- Print out the clock face template.
It's a "tracer page" so that young children can practice
their numbers. It's a little bit smaller than I would have
preferred, but it had to fit in the plate.
- if you're making the craft with older children, you can have them trace a circle... (an old CD is about the right size for tracing).
- Then have them print their own numbers on the circle -- you may want to pre-make an example so they can follow along how the numbers are arranged.
- Suggest to them that it's easier to do 3, 6, 9 and 12 first (the four corners) and then fill in the other numbers after.
- If you chose not to use the template, you'll have to make your own hands too.
-
 Cut out the clock face and the hands.
 - Glue the face onto the center of the paper plate
- Either poke a hole with a pencil through
the center of the clock (adults should do this part) and put the hands
on with brass fasteners OR just glue the hands onto the clock,
pointing to ONE O'CLOCK.
- If you use brass fasteners, you can have the kids turn the clock to TWO O'CLOCK, THREE O'CLOCK, etc as you sing the different verses of the song.
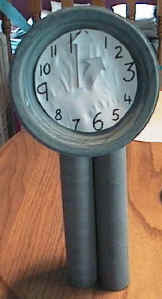
- Tape the three tubes together in a triangular shape (this will make the clock sturdy enough to stand up on its own).
- Glue or tape the paper plate to the top of the tubes.
- To make the clock even sturdier, you can cut a rectangular base out of a piece of cardboard and glue/tape the clock to it.
MOUSE:
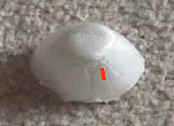
red mark shows
approximate place
to
put the ear slit
- Take your styrofoam cup and "squish" it lightly so that it's longer than it is wide (I find it looks more mouse like this way and the kids like squishing it *wink*)
- At this point, an adult should poke two slits in the
side/top of the egg carton.
- Cut out two ear shapes with tabs (like pink image beside these directions) out of a piece of cardboard. Don't worry about perfection!
- Cover with pink paper or paint pink.
-
Shove the tabs from the ears into the sides of the egg carton cup.

ear shape
-
 Make a yarn pom pom:
- wrap yarn around the diskette or piece of cardboard (or the serving platter from your toy kitchen set *grin*) about 30 times. You can mix different colors if you're using scraps of wool (we used dark brown, light brown and cream)
- Slide off and tie in the center
- for this one, we didn't actually snip the ends... We just left it as a loop so his "fur" wasn't too wild. It's up to you which way you want to do it.
- apply glue LIBERALLY all over the egg carton cup and drape the yarn pom pom over top.
- press down firmly
- let dry completely (er, I never listen to my own advice... We didn't let it dry for more than a minute before we continued on, but it's a lot more fiddly when you do the rest with the wool still wet)
-
 Tie a tail onto the back yarn of
the mouse. We used a scrap of rosey pink wool for this (I keep
EVERYTHING *grin*)
Tie a tail onto the back yarn of
the mouse. We used a scrap of rosey pink wool for this (I keep
EVERYTHING *grin*) - Glue the eyes and nose onto the front of the mouse (we used wiggly eyes and a pink pom pom nose, but you can use paper for the features!)
FINAL ASSEMBLY
- Tie a piece of wool that is 2 1/2 times the length of the clock onto the mouse.
- Put the wool through the clock. The child can pull the end of the wool to make the mouse climb up the OUTSIDE of the clock and let go of the wool so the mouse runs down.
- You can attach a craft stick or a straw to the end of the wool the child holds onto as a handle if you like.
- Kaitlyn had the most fun when she ignored the clock and just dragged her mouse along behind her (taking it for walks)
Printing the Template:
- Close the template window after printing to return to this screen.
- Set page margins to zero if you have trouble fitting the template on one page (FILE, PAGE SETUP or FILE, PRINTER SETUP in most browsers).
TEMPLATE FOR CLOCK