DLTK's Crafts for Kids
Paper Mache Frog Craft
(his mouth opens and you can put things inside!)
WHAT TO DO WITH THIS CRAFT:
There are lots of uses for the craft:
- make a Five Green and Speckled Frogs game (see instructions for the game,
- use the craft to store small toys, small books or keep treasures safe (who'd dare try to steal your prized possessions from this nasty critter!) Do not store food inside it.
- give it as a gift to a sibling or a grandparent
- have older children (Age 10+) make these to sell at fundraisers for the environment (point out that they're made from recycled materials!)
- have older children (Age 10+) make the Frog game for the children's hospital or special care facility. This would be a wonderful project to go do with the kids in hospital. The older children can pre-mache the project (up to the painting stage), take it to the hospital and help the kids paint and decorate their creatures.
There are two versions for this craft. This, paper mache version, takes a few more materials and a bit more time to make. It's appropriate for older children (Age 7+) to make independently or younger children (Age 3+) to make with help. The easier version is not a paper mache craft and provides a nice short-cut option for younger children or large groups.
Materials:
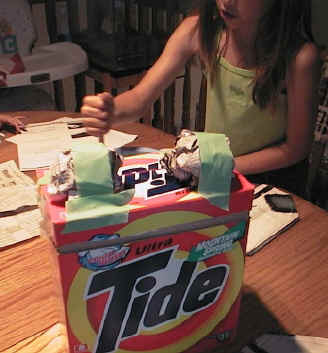
- Tide (laundry detergent) box. Doesn't really matter what size you use, as long as it's the standard type with the flip up lid.
- newspaper
- paper mache (1 part flour to 4 parts water... Bring to a boil while stirring. Take off stove and add 1 part really cold water and stir again (to cool it off so you can use it right away).
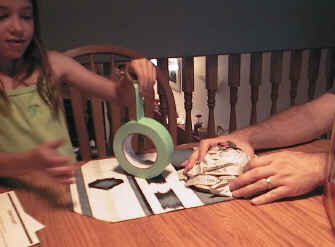
- masking tape
- paint - green (or mix blue and yellow together to
make your own green - put on your junior scientist caps!)
- You can also buy/make a lighter or darker green and paint on some speckles with it .
- We also used white for the eyes. If you don't have white paint, you could just paper mache the eyeballs with plain white paper and leave it at that.
- black marker or paint (eyeballs)
- construction paper or poster board (for the limbs...
we used green, but use what you have).
- OR you can take plain white paper or cardboard from old cereal boxes and paint it for the limbs if you don't have the construction paper or poster board... Or if you want this craft to be 100% recycled materials.
Instructions:
 Prepare paper mache paste.
(read more about How to Paper Mache
Prepare paper mache paste.
(read more about How to Paper Mache
- 1 part flour to 4 parts water... Bring to a boil while stirring.
- Take off stove and add 1 part cold water and stir again to mix (to cool it off so you can use it right away).
- Set aside.
- (adult help may be required)
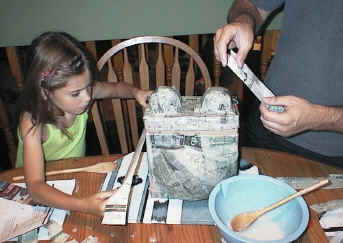
- Cut plastic handle off the box. (adult help may be required)
- use sand paper to lightly sand the finish off box. This helps the mache stick a bit better, but it is not crucial.
- MAKE THE EYES: Take a sheet of newspaper.
- Tear it in half.
- Crumple each half into a ball.
- Wrap tape (we used masking tape) around the balls to secure.
- Tape securely onto the laundry detergent box
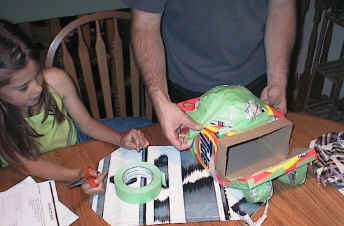
 You can see in the photos that it took a bit of help from
daddy. The two eyes were somewhat harder to tape on than the one eye for the purple
people eater. (I have a sneaking suspicion that daddy WANTED to help and Tasha was
just humouring him though... I finally had to slap his fingers and tell him to let Tasha
do some *grin*)
You can see in the photos that it took a bit of help from
daddy. The two eyes were somewhat harder to tape on than the one eye for the purple
people eater. (I have a sneaking suspicion that daddy WANTED to help and Tasha was
just humouring him though... I finally had to slap his fingers and tell him to let Tasha
do some *grin*)
 Make the tummy - this is not necessary, but I like how it looks.
- Take 2 or 3 pieces of newspaper and crumple them up.
- Tape them onto the front of the box like padding.
-
 If you want to disguise the box shape even more, you can pad the
sides and back too (just don't pad too far up the back -- make sure the lid will still
open!)
If you want to disguise the box shape even more, you can pad the
sides and back too (just don't pad too far up the back -- make sure the lid will still
open!) - We opted to tape on paper arms and legs after the fact, but you can paper mache them too. Just roll sausages of newspaper and tape them on. You can even use bent wire coathangers with newspaper taped on to give limbs more form. Just remember, this is a pretty big project without all these extras! I don't recommend adding too much complexity for children under 8
- This is where 10 thru 14 yr olds can have a lot of fun creating a customized creature!!!
-
 Tear newspaper into strips about 1 to 2 inches wide. You
can have some that are longer and some that are shorter.
Tear newspaper into strips about 1 to 2 inches wide. You
can have some that are longer and some that are shorter. - Paper mache the entire thing (you don't have to do the bottom of
the box).
- If you're doing this with younger kids and accidentally mache the mouth closed, it isn't a huge deal as you can just cut it open again when the mache dries.
- For older kids, tell them they should try not to mache the mouth closed
- You don't want more than 4 layers of mache added or it won't dry properly. I usually tell the kids not to add more than 2 layers (when they inevitably overlap things a bit more than they should, we end up with 4).
- Use shorter pieces when macheing around the eyes and horn if it's too finicky (or have younger kids mache the nice easy body and save the head for yourself).
- Let mache dry (set outside on a nice sunny or breezy day and it will dry very quickly).
- Apply a second coat of no more than 4 layers and let dry (one coat is enough, but the more coats you add the sturdier it will be ... Especially if you've added mache limbs and tail). Let dry. Apply a third coat. Let dry.
- The very top layer of mache can be done with white paper towels or toilet paper. This will give the "skin" a rough texture and will make it easier to apply paint. For a less rough texture use white paper.
-
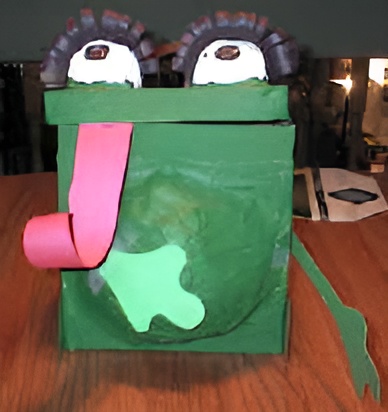
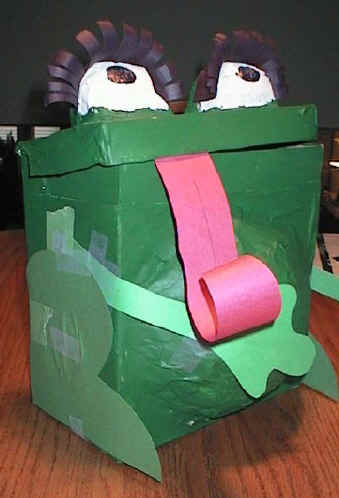
 Once the mache is completely dry, paint the body green.
- Acrylic paint can by used by older children and does coat it a bit better. It's also water proof, unlike tempra paint.
- We used acrylic paint and Tasha (Age 6) was very proud to be using "grown-up paint".
- You could spongepaint on a second layer of darker or lighter green for a neat speckly look or just paint on a few speckles with a brush. Or do this to the belly with lighter paint.
- Paint the eyeballs white (or paper mache on white paper/papertowel/toiletpaper). Actually, you could make the eyeballs whatever color you like too (green might look nice!).
- Put on the eye centers with black paint or marker.
-
 Cut arm, leg and wing shapes out of cardboard or construction
paper. Tape/glue them to the completed creature. (Once again, Kaitlyn Age 2
helped us with the taping so we have a tad more than would really be needed).
Cut arm, leg and wing shapes out of cardboard or construction
paper. Tape/glue them to the completed creature. (Once again, Kaitlyn Age 2
helped us with the taping so we have a tad more than would really be needed). - Glue eyelashes onto the eyeball. Take a strip of construction paper and fold a 1/2 inch tab. Slit the strip every 1/4 inch or so all the way down to the tab. Curl around a pencil and glue to the eye.
- Tape on a red construction paper tongue. Draw a line down the middle with a pencil or pen. Curl it around a pencil to make it more tongue-like.
Print friendly version of these instructions